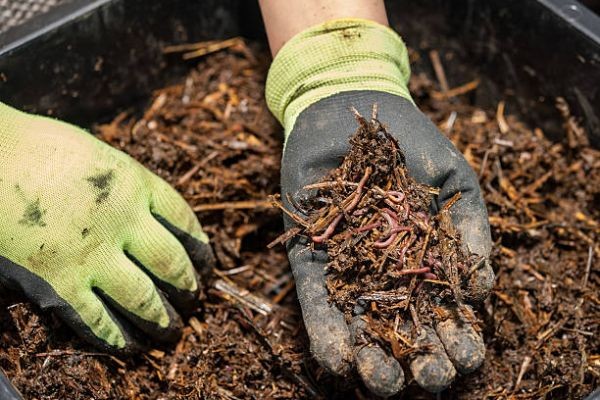
Starting a worm farm can be a simple way to recycle kitchen scraps while creating useful worm castings for your garden. You don't need a large backyard or complicated equipment to get started.
With a suitable container, bedding, composting worms, food scraps, and the right conditions, you can create a small worm farm at home and gradually build a healthy worm population.
Let's look at how to start a worm farm and what you need to know to keep it working properly.
What Is a Worm Farm?
A worm farm is a controlled environment where composting worms break down organic material such as fruit and vegetable scraps.
As the worms process the material, they produce worm castings. These castings can be used as part of your gardening routine.
A worm farm can be kept outdoors or, with the right setup, in a suitable indoor area such as a garage or utility space.
What Do You Need to Start a Worm Farm?
You don't need many things to begin.
The basic supplies include:
- A suitable worm farm or ventilated container
- Composting worms
- Bedding material
- Suitable food scraps
- Moisture
- A shaded or protected location
The most important thing is creating an environment where the worms can stay comfortable and process food gradually.
Choosing the Right Worms
Choosing the right worms is one of the most important steps when learning how to start a worm farm.
Not every earthworm is suitable for vermicomposting. Composting species such as Red Wigglers are commonly used because they are well suited to living in organic-rich environments and processing food scraps.
Garden earthworms generally have different habitat preferences, so simply collecting worms from your garden may not give you the best results.
Choosing a Worm Farm Container
You can purchase a purpose-built worm farm or create a suitable container yourself.
Whatever option you choose, the container should provide enough space for the worms and allow proper airflow and drainage.
A good worm farm should also give you convenient access for adding food and checking the condition of the bedding.
Avoid completely sealed containers because worms need oxygen to survive.
Preparing the Bedding
Before adding your worms, prepare a comfortable bedding layer.
Suitable bedding materials can include:
- Shredded cardboard
- Plain paper
- Aged compost
- Coconut coir
- Decaying leaves
- Other suitable organic bedding
The bedding should be moist but not soaking wet. A simple way to check it is to squeeze a handful. It should feel damp without releasing a large amount of water.
Adding the Worms
Once the bedding is ready, gently place your composting worms on top.
Give them some time to move down into the bedding and become familiar with their new environment.
There's no need to immediately add a large amount of food. Allowing the worms to settle first can make it easier to establish a stable worm farm.
What Can Worms Eat?
Composting worms can process many common kitchen scraps.
Good options include:
- Vegetable scraps
- Fruit scraps
- Coffee grounds
- Tea leaves
- Crushed eggshells
- Small amounts of plain cardboard
- Soft plant material
Cutting larger pieces into smaller pieces can help them break down more quickly.
What Should You Avoid Feeding Worms?
A worm farm isn't designed to handle every type of kitchen waste.
Avoid or limit materials such as:
- Large amounts of meat
- Dairy products
- Oily or greasy foods
- Very salty foods
- Heavily processed leftovers
- Large quantities of acidic foods
When you're learning how to start a worm farm, it's better to begin with simple plant-based scraps and gradually learn how your worms respond.
How Much Food Should You Add?
One of the most common beginner mistakes is adding too much food.
Worms need time to process what is already in the bin. If you keep adding scraps faster than they can break them down, uneaten food can accumulate and create odors or attract unwanted pests.
Start with small amounts and increase feeding gradually as the worm population grows.
Where Should You Keep a Worm Farm?
Location can make a big difference.
A worm farm should generally be kept somewhere protected from extreme temperatures and direct harsh sunlight.
A shaded outdoor area, covered balcony, garage, or other suitable space can work depending on your climate and setup.
Try to choose a location where you can easily access the worm farm and add food regularly.
How Do You Maintain a Worm Farm?
A worm farm doesn't require constant attention, but it does need occasional monitoring.
Keep an eye on:
- Moisture
- Temperature
- Food levels
- Bedding condition
- Airflow
- Worm activity
- Unusual odors
The bedding should remain damp but not waterlogged. If the bin becomes too wet, add dry bedding material and improve drainage or airflow.
If it becomes too dry, add a small amount of water.
How Long Does It Take to Get Worm Castings?
Worm castings don't appear overnight.
The time required depends on the number of worms, amount of food, temperature, moisture, and other conditions.
As the worms and microorganisms break down the organic material, the bedding gradually changes into a darker, crumbly material.
Once enough material has been processed, you can harvest the finished castings and use them in your garden.
Common Worm Farm Mistakes
Beginners often run into a few simple problems.
Try to avoid:
- Overfeeding the worms
- Letting the bedding become too wet
- Allowing the bin to dry out
- Placing the worm farm in extreme heat
- Using unsuitable food scraps
- Disturbing the bedding too often
- Starting with too many worms for the available space
The key is to start slowly and allow the worm population to adjust.
How to Start a Worm Farm With Red Wigglers
Red Wigglers are a popular choice for home vermicomposting because they are well suited to breaking down organic waste.
If you're planning to start a worm farm, Memes Worms offers Pure Red Wiggler Composting Worms that can be used for home vermicomposting. You can learn more about their worms and composting resources at https://memesworms.com/
Starting with healthy composting worms and providing suitable bedding, food, moisture, and temperature can give your worm farm a good foundation.
Conclusion
Learning how to start a worm farm doesn't have to be complicated. Start with a suitable container, prepare moist bedding, add the right type of composting worms, and feed them suitable organic scraps gradually.
The most important part is maintaining balance. Don't overfeed, keep the bedding comfortably moist, provide good airflow, and protect the worms from extreme temperatures.
Once the system becomes established, your worms can continuously process suitable kitchen scraps and produce useful castings for your garden.
Frequently Asked Questions
1. How do I start a worm farm at home?
Start with a suitable ventilated container, moist bedding, composting worms such as Red Wigglers, and small amounts of suitable food scraps.
2. What worms are best for a worm farm?
Composting worms such as Red Wigglers are commonly used because they are well suited to vermicomposting systems.
3. How often should I feed my worms?
Feed them gradually rather than following a strict daily schedule. Add more food as the existing material is being processed.
4. Does a worm farm smell?
A healthy worm farm should generally have an earthy smell. Strong unpleasant odors can indicate overfeeding, excess moisture, or poor airflow.
5. Can I keep a worm farm outside?
Yes, but it should be protected from extreme heat, cold, and direct harsh sunlight. A shaded and sheltered location is generally better.